
Shiprocket Integration for Repair Shops: Book Couriers and Track Parcels in BytePhase
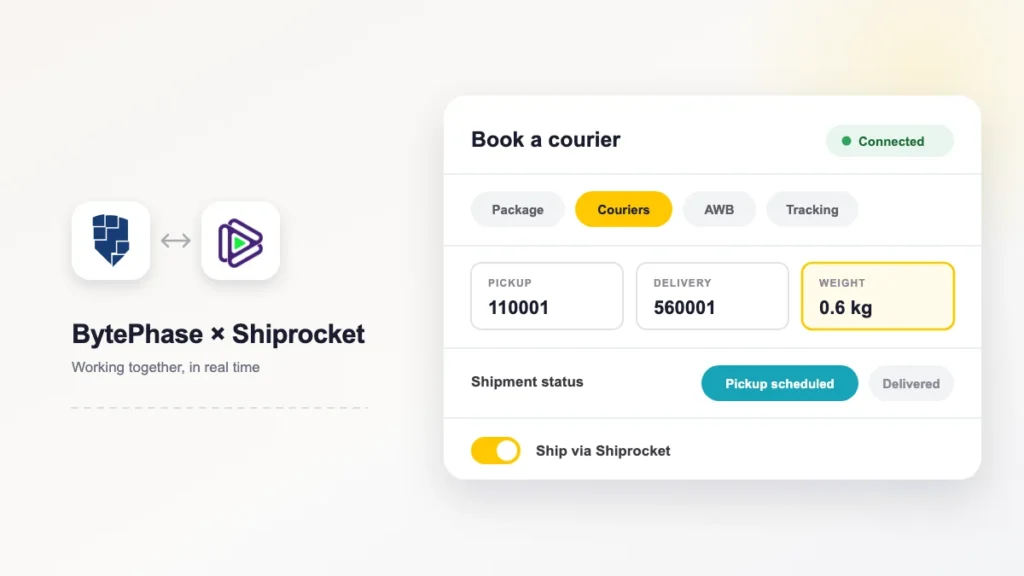
The Shiprocket integration connects your Shiprocket account to BytePhase so you can book a courier without leaving the repair job. You enter the package weight and both addresses, compare the couriers that actually serve that route, pick one on rate and delivery estimate, and BytePhase creates the order, captures the AWB tracking number onto the job and schedules the pickup. Tracking and cancellation stay on the same screen.
This guide walks through the whole thing as it ships today: what you need before you start, how to connect it, how to book and track a shipment, what every status means, and what to do when something does not work. For the feature overview instead, see the Shiprocket integration page.
Why a repair shop needs a courier integration at all
Repair shops ship more than people assume. A repaired handset goes back to an out-of-town customer. A stubborn logic board goes to a specialist in another city and comes back a week later. A dead-on-arrival unit goes to the brand as an RMA. None of that is e-commerce order volume, but every one of those parcels is somebody’s device, and every one of them generates the same question three days later: where is it?
Without an integration, that work happens in two systems at once. You open the Shiprocket dashboard in a second tab, retype the customer address you already have in BytePhase, book the parcel, copy the AWB number back onto the job, and then field the status calls by pasting tracking numbers into a courier website. The failure is not dramatic — it is just a tracking number that never made it back onto the job, and a customer nobody can answer.
Connecting the two collapses that into one screen. The booking reads the addresses BytePhase already holds, the AWB lands on the job automatically, and the shipment history sits on the job next to the repair itself. That is the whole of what the Shiprocket integration does, and it is why shops turn it on.
Before you start: what the Shiprocket integration needs
- A Shiprocket account with an API user. This is not your normal dashboard login — Shiprocket issues separate API credentials, covered in step 1 below.
- A BytePhase user with integration write access. Both connecting the provider and creating a shipment are gated on the integration write permission, so a technician account without it will not see the action succeed. Set this on the role, not per user.
- An Indian shop. Shiprocket is an India-only courier aggregator, and the integration card only appears for shops in India. If you do not see it in your integrations list, that is why.
- A pickup address with a real pincode. Courier availability is decided by pickup pincode, delivery pincode and weight, so a shop profile with a missing or wrong pincode returns an empty courier list.
Step 1 — Create a Shiprocket API user
Shiprocket keeps API access separate from your dashboard login. In the Shiprocket panel, go to Settings → API → API Users and create a user there. You will get an email address and a password that exist purely for the API.
Two things worth knowing before you move on:
- Your everyday Shiprocket login will not authenticate against the API. If the connection fails immediately, this is almost always the reason.
- Create a dedicated API user rather than reusing a staff member’s account. When that person leaves and their access is revoked, your shipping integration goes down with it.
Step 2 — Connect Shiprocket in BytePhase
In BytePhase, open Settings → Integrations and find the Shiprocket card, described as “Automate courier shipping & tracking”. Click Configure.
The dialog asks for exactly two things — the API email and the API password from step 1. That is the whole form. Paste them in and click Connect.
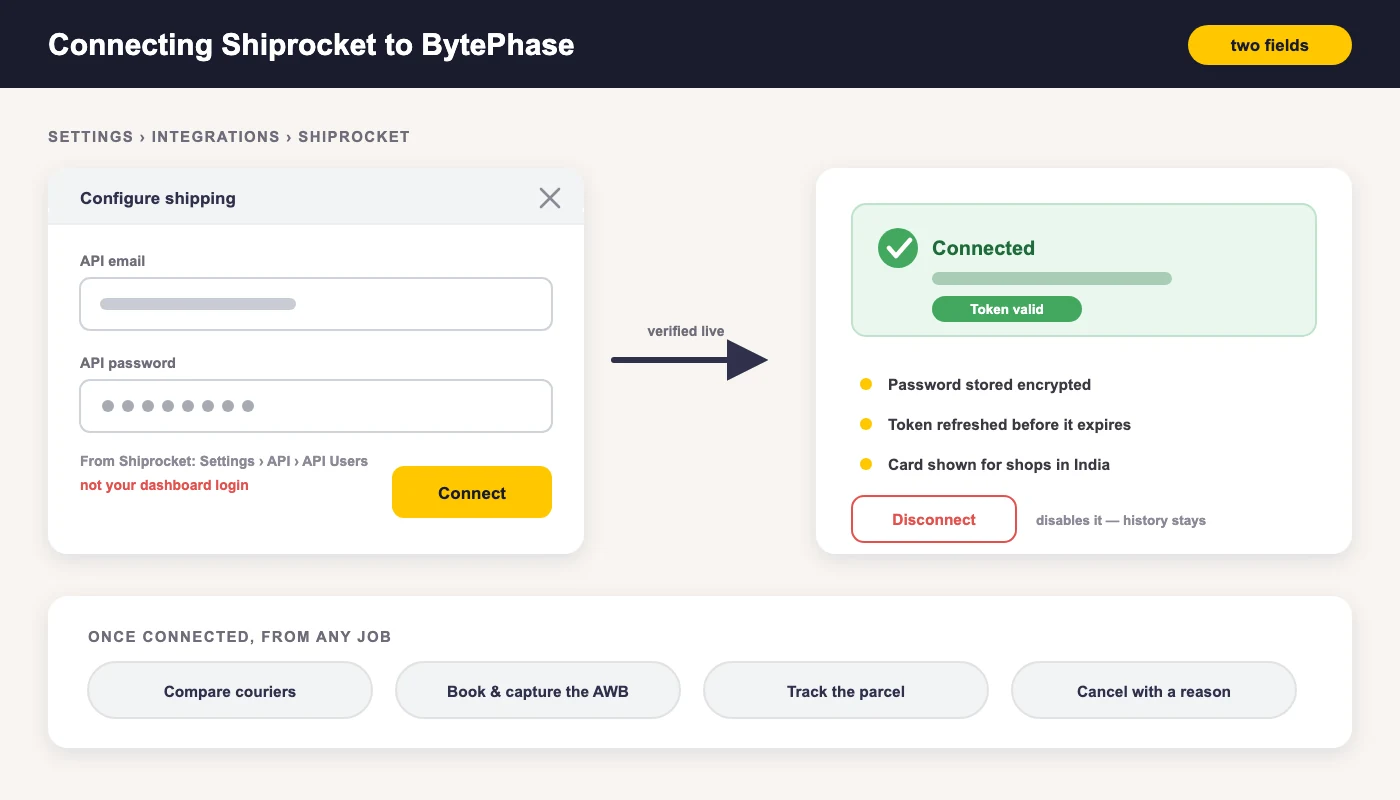
BytePhase authenticates against Shiprocket straight away, so you find out in that moment whether the credentials work rather than discovering it on your first real parcel. If they are wrong you get the error back inline and nothing is saved.
Once connected, the card flips to a green Connected panel showing the API email you used, whether the access token is currently valid, and a Disconnect button. A few details behind that panel:
- The password is stored encrypted, not in plain text, and it is never sent back to the browser — the integration read API strips it out of the response.
- The access token is refreshed for you. Shiprocket tokens expire, so BytePhase tracks an expiry and renews the token before it lapses. A panel reading “token expired, will refresh” is normal and needs nothing from you.
- Disconnect is reversible. It disables the integration rather than deleting your shipment history — past shipments stay on their jobs.
Step 3 — Book a shipment from the job
Booking happens where the work already is. Open the repair job, choose Add delivery, and turn on Ship via Shiprocket. The delivery form expands into the shipping section.
Package details
Four numbers: Weight (kg), and Length, Breadth and Height in centimetres. Weight is the one that matters most — it is what courier availability and rate are quoted against, so a guessed weight produces a quoted rate you will not actually be billed. Weigh the packed parcel, not the bare device.
Pickup and delivery addresses
Both are prefilled — the pickup address from your shop profile, the delivery address from the customer on the job — and both are editable in place for the one-off case where the customer wants it sent to an office instead of home. The pincode on each is the field that drives everything downstream.
Compare couriers, then choose one
Click Check available couriers. BytePhase asks Shiprocket which couriers serve that pickup pincode to that delivery pincode at that weight, and returns them as a table you pick from:
| Column | What it tells you |
|---|---|
| Courier | The specific courier company, not just the aggregator |
| Rate | What that courier charges for this parcel on this route |
| Est. delivery | The estimated delivery time the courier is quoting |
Select a row and its rate is copied into the delivery charges field on the job, so what you quote the customer and what you were quoted are the same number. If the list comes back empty you will see “No couriers available for this route” — check both pincodes and the weight before assuming the route is genuinely unserviceable.
Then save the delivery. Shipments booked this way go out as prepaid.
How it works
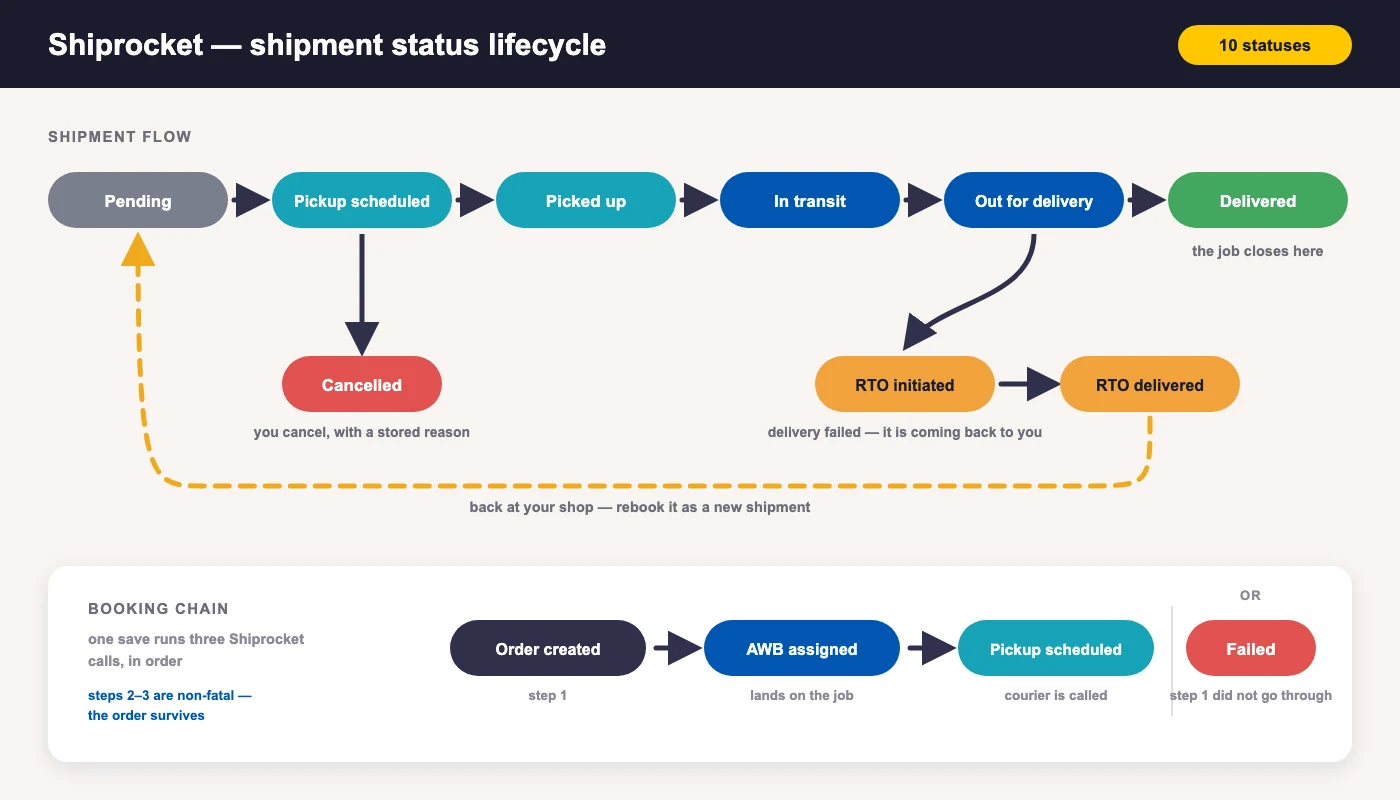
Two things happen behind that one save: a short booking chain that hands the parcel to a courier, and then a status lifecycle that runs for as long as the parcel is travelling. The whole picture, end to end:
The booking chain — one save, three calls
Clicking save runs three Shiprocket calls in order, and the sequence is worth knowing because it explains the one partial state you can end up in:
- The order is created in Shiprocket, carrying an identifier that ties it back to your shop and this specific shipment.
- The AWB is assigned for the courier you picked, and the AWB number and courier name are written onto the shipment record on the job.
- The pickup is scheduled with that courier, and the shipment moves to Pickup scheduled.
Steps 2 and 3 are deliberately non-fatal. If the AWB cannot be assigned — most often because the courier you selected has just stopped serving that route — the order still exists in Shiprocket and is not silently thrown away. The shipment simply sits without an AWB, and you can let Shiprocket auto-assign a courier or rebook. Only a failure at the first step marks the shipment Failed.
The status lifecycle — pending to delivered
From there the shipment walks the top row of the diagram: Pending while it is being handed over, Pickup scheduled once the courier has been called, then Picked up, In transit, Out for delivery and finally Delivered, which is where the job closes.
Only two things pull a parcel off that path. You can cancel it yourself before it goes far, which stores your reason against the shipment. Or the delivery fails and the courier starts an RTO — return to origin — which is the dashed loop on the diagram: the parcel comes back to your shop, and once it lands you rebook it as a new shipment rather than reviving the old one.
Step 4 — Track it, and cancel if plans change
Every shipment lands on the job’s Delivery history, which is where both remaining actions live.
Track shipment queries the courier live through Shiprocket and opens a panel with the current status as a colour-coded badge, the AWB code, the courier name, a cancellation reason if there is one, and a link through to the courier’s own tracking page. It is not just a read — the status it comes back with is written to the shipment, so the job reflects reality from that moment on. This is the reliable way to refresh a parcel before you call a customer back.
Cancel shipment cancels the order at Shiprocket and asks you for a reason in the process. Type a real one. Six months later, “customer rescheduled pickup” is the difference between a shipment history that explains itself and a row that just says cancelled.
What each shipment status means
BytePhase normalises the courier’s wording into ten statuses, so a parcel reads the same way whichever courier is carrying it:
| Status | What it means | What you should do |
|---|---|---|
| Pending | The shipment record exists but no courier has it yet | Nothing — it should move within moments of booking |
| Pickup scheduled | AWB assigned and the courier has been asked to collect | Have the parcel packed and labelled |
| Picked up | The courier has physically collected it | Tell the customer it is on the way |
| In transit | Moving through the courier network | Nothing |
| Out for delivery | On the vehicle for final delivery today | Make sure the customer is reachable on the number given |
| Delivered | Handed over at the destination | Close the job |
| Cancelled | Cancelled at Shiprocket, with the reason stored | Rebook if the device still needs to travel |
| RTO initiated | Return to origin started — delivery failed and it is coming back | Contact the customer before it lands back with you |
| RTO delivered | The parcel is back at your shop | Confirm the device is intact and rebook |
| Failed | The booking itself did not go through at the courier | Check the addresses and weight, then rebook |
The two RTO statuses are the ones worth watching. A returning parcel is a customer who was not home and does not yet know their device is travelling back — it is far better to make that call before the parcel arrives than after.
Where repair shops actually use this
Returning a repaired device to an out-of-town customer
The most common case, and the one that pays for the integration. The repair closes, you add the delivery, ship via Shiprocket, and the AWB is on the job before the customer asks for it. When they do ask, the answer is one click on the job rather than a hunt through a courier website.
If the customer is local and collecting in person, none of this applies — that is a counter handover, and it belongs to OTP-verified delivery instead.
Sending a board out to an outsourced specialist
Micro-soldering, data recovery, a board-level fault your bench does not cover — the unit goes to a specialist in another city and has to come back. Booked through the integration, both legs carry AWBs on the same job, which is exactly what you want when a vendor job stretches past the date you promised the customer.
Doorstep collection where the courier does the travelling
If you run pickup and drop with your own field executive, that is a doorstep trip with live GPS and proof at the door. When the distance makes that impractical, the same task runs in courier mode instead, and Shiprocket is pre-selected as the provider when your shop has it connected.
Troubleshooting the Shiprocket integration
| What you see | What it usually is |
|---|---|
| No Shiprocket card in Settings → Integrations | The card is shown for shops in India only. Check your shop country. |
| The connect dialog rejects your credentials | You used your Shiprocket dashboard login. The API needs a user created under Settings → API → API Users. |
| “No couriers available for this route” | Almost always a pincode or a weight, not the route. Confirm both pincodes and make sure the weight is set. |
| Configure or the shipping action does nothing for a staff member | Their role is missing integration write access. Grant it on the role. |
| A shipment stuck with no AWB | AWB assignment failed after the order was created. The order is alive at Shiprocket — let it auto-assign a courier, or rebook. |
| The status looks stale | Open the shipment and use Track shipment. It queries the courier live and writes the result back to the job. |
| The panel says the token expired | Expected. Tokens are renewed automatically before they lapse — no action needed. |
The short version
Create a Shiprocket API user, paste those two credentials into Settings → Integrations → Shiprocket, and from then on every parcel is booked from the job it belongs to. You compare real couriers on real rates for the actual route, the AWB lands on the job by itself, and tracking and cancellation are one click away on the same screen. The retyping, the second browser tab and the lost tracking numbers go away.
The full capability list lives on the Shiprocket integration page, and everything else BytePhase connects to is on the integrations page. If you would rather be walked through it, book a demo.